Help Center
Signing Room for Professionals
How to Start a Signing Session
To begin your signing from the waiting room, do as follows:
1. Click Start Recording.
This will begin a screen recording with audio of your signing.

2. Click Start Signing.
If all KBA and ID Verifications and document uploads have been completed, this button should be in green.

3. If you have successfully started the signing, your screen will load and show the documents to sign, with both you and your customers on video.

4. If the signer doesn’t join before the recording, you’ll recieve an alert when they are trying to access the session.
Click Allow In.

And now, the signing can begin!
Signing Room Components
The signing room has many different assets to it to help give you as a professional more help during the signing process. Here is a breakdown of the signing room:
Now Viewing: this section will show which document is currently up for signing and ready to be signed. It will have whatever file label you gave the document when you uploaded it to your file.

Fields: This shows how many signatures are on the document to be completed.

Exit Signing: This button will exit the signing.
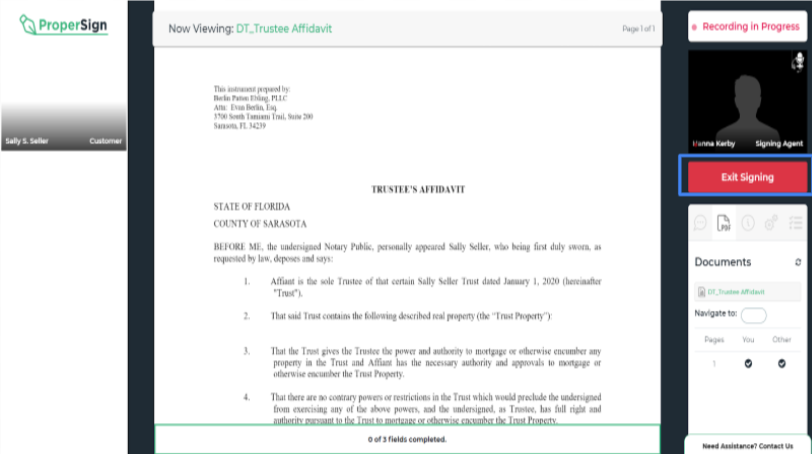
Navigation Tab: This tab is where you will have PDF controls, settings and more!

PDF Navigation: The PDF navigation tab is where you will be able to switch between documents. This will be the first opened tab by default. To switch between different documents, click on the Document Name that you wish to navigate to. If you would like to navigate to a specific page on a document, enter the page number you would like to enter on the Navigate To search box, and hit Enter.

Settings Tab: This tab, which is the Gears tab, is where you can change the settings of your signing. The different settings we offer include:

- Others Navigation: This setting allows signers to also navigate pages of a document. This is turned off by default.
- Sync Scrolling: With sync scrolling, you will be able to see where your signer is scrolled to on a page, and the signer will be able to see where you scroll to as well. This is recommended to be turned on and is turned on by default.
- 2-Factor Authentication: If you need more authentication, you can turn on 2-factor to send an SMS text code to your signers
Notes Tab: the last tab in this section. This is where you can write your own notes or look at your notes during the signing.
Chat Tab: the first tab in this section. This is where you can chat with clients and clients can chat with you in case of audio connectivity issues.
How to Sign a Document
To sign your document:
1.Click your corresponding signature box.

2. A pop up will appear confirming that you want to sign with your electronic signature.
Click Yes.

3. Your signature will now appear on the document.

How to Notarize a Document
Notarizing a document is very similar to how you sign a document:
1. Click your notary stamp.

2. A pop up will appear confirming that you want to add your digital notary stamp.
Click Notarize.

3. Your notary stamp will now appear on the document.

